RENEGADE GARDENER™
The lone voice of horticultural reason
Don’t install plastic landscape edging improperly.
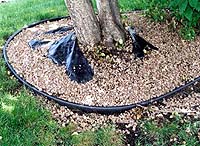
Magnificent commercial installation: black plastic, pink rock, edging set too high
Such a simple, helpful product, yet so easy to screw up.
7-6-2002 — First off, a few notes: some gardeners don’t like to edge their beds with plastic edging, having found that when they want to expand or change a bed, well, there’s the edging to deal with. Edging keeps lawn grass from invading the garden beds, but isn’t necessary if you cut a narrow trough an inch or so deeper than the grass roots, all around your beds, and maintain it weekly. A nice, veddy English look, but one that requires fastidious maintenance.
I use plastic edging anytime I’m creating a bed that I trust is perfect the first time, and install a lot of it when I’m out doing residential garden installations. And man, do I see a lot of lousy homeowner AND professional installations. Here’s what you need to know:
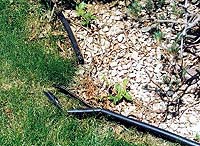
Improper connection resulting in heaving and mower damage
Buy expensive, commercial-grade edging. The good stuff measures five-and-half inches wide, or more. That cheap, flimsy stuff sold at Menards and Home Depot is too susceptible to frost heave, especially the stuff that doesn’t come with steel stakes. Landscape supply yards sell the good stuff – I use Ace of Diamond brand – and some home centers are now stocking a good commercial grade, with the stake kits.
Prepare your edge by digging or rototilling a six-inch deep trough outlining the bed. It’s best if the soil inside the bed has been prepped/rototilled before you install the edging, or you might hit it with the rototiller after installation. Cut roots if you have to, because you must get down a clean six inches all the way along the edge.

Total frost heave of homeowner installation: cheap edging, wrong side out, no stakes
Edging goes in with the little curled-up “V” at the bottom facing the bed, not the lawn. Place the edging into the trough, curving it along so that the whole piece is loosely installed. Good edging comes in twenty-foot lengths; cut it to fit using your serrated bread knife, or utility knife.
If the bed edge is longer than twenty feet, use the connectors that come in the spike kit, but this is a biggie: slide one end of the connector into the top circle halfway, then slide the next piece on, MAKING SURE YOU AREN’T SIMPLY PUSHING MOST OF THE CONNECTOR INTO THE FIRST PIECE. I see this all the time. The connector is about eight inches long, and when finished, you need four inches in one piece and four inches in the adjoining piece. Place the connector in the first piece halfway, lift that end up, then slide the next piece on by pushing down on the connector slightly with this second piece, plus squeezing the circle of the first piece, around the connector. The connector will stay put.
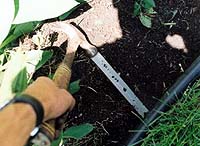
 Now you are going to set the edging into the soil. What most people don’t know is that in a finished installation, only the top half or third of the circle should be visible. People set the edging too high, thinking that the whole circle is supposed to sit on top of the ground, so when finished it looks like a hose lying on the ground. No. Only the top half or third of the circle should be visible when finished. Now you’ll never hit it with the lawnmower, it isn’t visible during the summer, and it still blocks the grass roots from entering the garden bed. Very important.
You’ll have plenty of loose dirt on the bed-side of the edging. Pull it down with your hands and push it under the bottom V edge of the edging, so it’s loose and forces the edging up an inch or so. Work your way down the bed, pushing the edging into this loose soil so that the top of the circle is as described above.

Stomp your outward corners
Stomp your outward curves. By this I mean you’ll notice that where the edging curves away from the bed and out into the lawn, it naturally pulls back from the deep part of the curve. Good edging is a little stiff. So you need to push the edging tight outward, because it will want to flatten the curves you cut into your bed outline. So push it out where it belongs, pull soil down to it, and stomp on it with your feet, to hold it in place.
Now, before you add any more soil, install the stakes. Starting three inches in from the beginning of the edging, place the pointed tip of the stake into the V at the bottom of the edging. The end you hit with a hammer is bent at a ninety-degree angle. Be sure the short, bent part is facing down (see illustration). (By the way, this illustration was drawn by yours truly, the Renegade Gardener, and is the first illustration to ever appear on the site. Having failed art in kindergarten, I thought it came out rather well. The original illustration, signed by me, fine-point-Sharpie-on-copy-paper, unframed, is for sale for $89.00. Serious E-mails only.)
Pound stakes at flat angle
Here’s the most important tip so far: don’t pound the stakes straight down into the ground. Don’t pound them in at a forty-degree angle, either. Pound them in at a very flat angle, twenty-five degrees max. Pounded straight down into the ground, frost will eventually heave the edging upward. Maybe not all the way, but enough so that it rises noticeably after several years.
Pounded in as close to parallel with the soil surface as possible, however, the edging will never move. You need to push some of the soil away from the stake area to facilitate getting the stake close to perpendicular to the edging, let alone hitting it with the hammer. Use four stakes per twenty-foot length, one at the start, one at seven feet, one at fourteen feet, one at the other end. If you are connecting two pieces of edging, you do need stakes at the end of each joined by the connector, i.e., you’ll have two stakes only about six inches apart on either side of a connector. You won’t believe what frost can do.
Pull the soil down from the bed-side so that it’s two-thirds of the way up the edging, and stomp all that soil in right along the edging. You’re setting the soil hard into the V at the bottom, and that further keeps the edging from heaving out in spring.
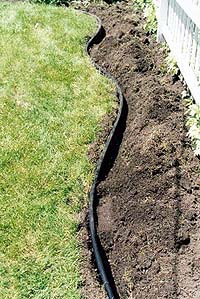
Nearing completion: stakes in, corners stomped
Next filter soil through your hands into the narrow gap left between the edging and the lawn-side. This will never be a perfect fit, there are gaps, so get some soil down on the outside of the edging too, so the grass will grow back tight to the edging.
Water the edging. Walk along with the hose and water the soil in on both sides. This causes the soil to settle in tight on both sides.
Pull the rest of the soil from the bed even with the edging, add a little more soil to the grass side, because watering will have made it settle. You’re done. Your installation is good for fifty years.
Don Engebretson
The Renegade Gardener