RENEGADE GARDENER™
The lone voice of horticultural reason
Planting on a Slope
 |
| Oh all right, one photo from my January vacation in Kauai. |
02-1-10 –I launched this site eleven years ago simply to relate useful gardening information, as the hundreds of articles found by clicking any of the buttons to the left will attest. However, this fall it occurred to me that many of my winter updates in recent years have been devoted to self-indulgent slide shows from my travels, or most often my bemused comments on garden industry politics, trends, and buffoonery. The latter provide grist for the dilapidated mill that spits out my annual High Spot/Black Spot Awards each January, of course, but now that February is here, how about I get back to relating practical gardening advice?
Here’s a topic I’ve never touched on. We don’t always plant on flat, level ground, unless you garden in Winnipeg, come to think of it. Flattest city and suburbs I’ve ever seen. Makes Omaha look like Rome, no mild trick. Wonderful city, don’t get me wrong, just—flat. So Winnipeg aside, quite often it’s a slope of some degree on which we feel inspired to plant trees, shrubs or perennials. Here’s an important technique to know when planting on a slope.
When planting on a slope, build up a 180-degree “shoulder” on the downhill side of the plant. What is a shoulder? It’s a small to large berm made of soil that in essence creates a level space all the way around the plant. If you build shoulders when planting on a slope, water soaks in around the plant, instead of running down the slope (often creating a ravine through the planting hole).
I have two photos I’ll get to in a minute, but knocking out two potentially embarrassing, amateurish drawings should help convey the principle nicely:
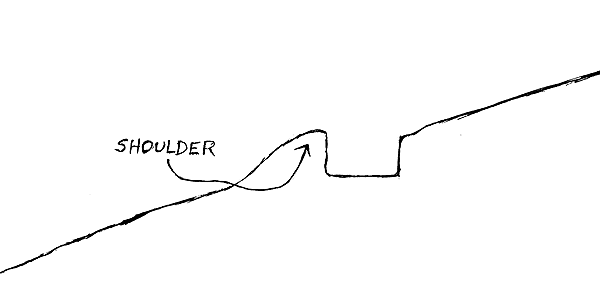 |
| Sideways (worm’s eye?) view of a planting hole on a slope. |
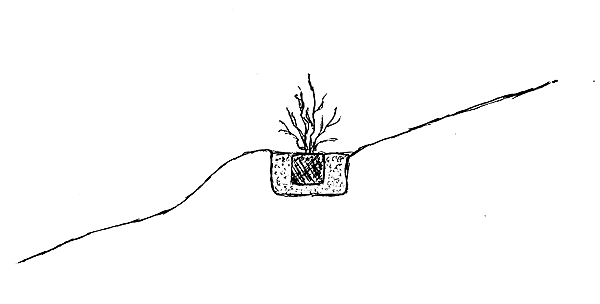 |
| After planting. Now, when you water, or it rains, the moisture soaks down around the plant. |
The sketches came out fairly well, I think, particularly considering it’s 1:30 in the morning and the update is due tomorrow. Or today, I guess. So where does the soil come from with which to fashion the shoulder? It comes from the planting hole. When planting a slope, start digging your hole and dump each shovelful of dirt in a semi-circle around the downhill side of the edge of the hole. When the hole is finished, move the excavated soil around with your hands to fashion your shoulder. Be sure your shoulder feathers out on each end so that it levels off the entire downhill half of the hole. Pack it down with your hands as you build it and give the entire shoulder a final compaction with the bottom of your boot, stomping firmest at the base.
Two photos of shoulders:
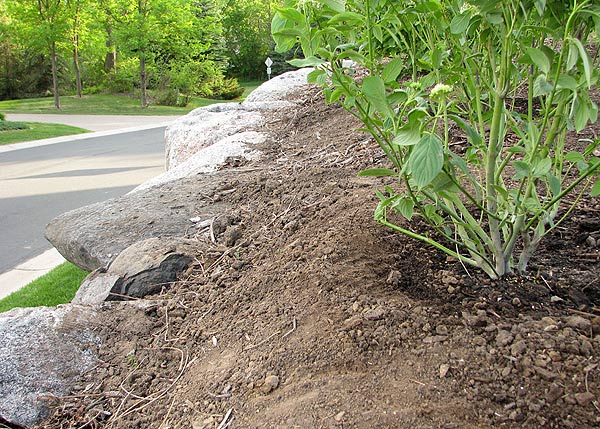 |
| A planting area atop a large boulder wall; more of a slope than it appears in the picture. |
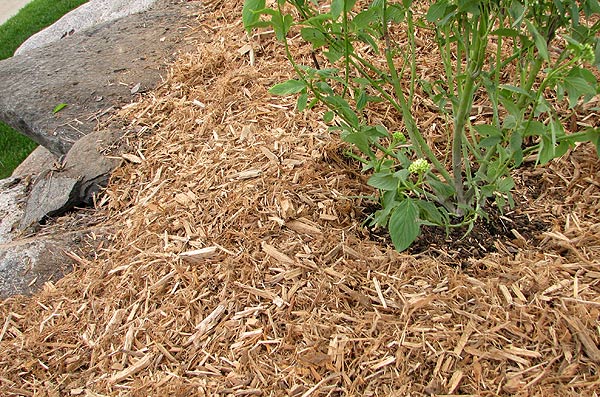 |
| Mulch shoulders heavily, before initial watering of the plant. |
Shoulders can be built on virtually any grade slope. If planting perennials on a hill, build little shoulders for each perennial or one long, sweeping shoulder for every three or four. Shoulders are essential if you plan to add drip irrigation hose around the plant(s). You can circle the tree or shrub with the hose, keeping it just inside the shoulder. No shoulder, your irrigation water runs right down the hill. Shoulders also keep the loose planting soil around the plant (or the entire plant) from washing out during heavy downpours.
On steeper slopes, the shoulder sometimes will use up all the soil from the hole, and then some, so you may need additional soil handy to be sure the shoulder is big enough, and for filling in the hole around the plant’s root ball. Just be sure you pack the shoulder in well with your boot, and mulch it with 3-4” of shredded hardwood before watering. Then if you get a deluge of rain a few days later, the shoulder won’t wash out, and after a season of root growth and natural mulch cohesion, the shoulder is there for good.
Don Engebretson
The Renegade Gardener