RENEGADE GARDENER™
The lone voice of horticultural reason
Project #1 Update & General Spring Foofaraw
6-7-05 – APOLOGIES TO ALL COMRADES for the delay in my updated column, not that any regular readers expected this update to appear anywhere near the date advertised. Four weeks of rain in the Twin Cities between April 1 and the end of May have knocked my small, ramshackle landscaping enterprise for a monstrous, muddy loop. I am now two weeks behind schedule, yet so very grateful to be a small, one-crew operation. Most huge landscaping operations are three weeks behind. My advantage over them is that I hire only very young children for my crew, kids who have not yet learned that most landscape employees don’t work on Saturdays and Sundays, or that other landscape workers aren’t paid in comic books and gum.
 |
| Has the Renegade Gardener lost his mind? |
First off, a report on Landscape Job #1, to see how many of you could figure out why in the world the Renegade Gardener would have delivered to the job site three pallets of the most disgusting landscape product ever devised: concrete retaining wall block.
Well, here’s my little secret (kudos to several e-mailers who saw this coming a mile off): IT IS PERFECTLY ACCEPTABLE TO USE CONCRETE RETAINING WALL BLOCK IN YOUR LANDSCAPE—IF YOU PLACE IT SO YOU CAN’T SEE IT.
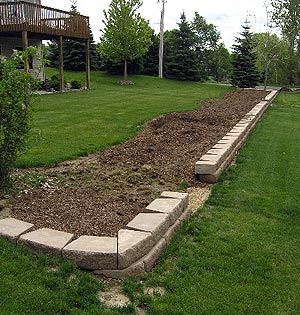 |
| When planted, the concrete block will be invisible to the client. The gap in the wall is for a dry creek bed to handle an established drainage route. |
The clues were all there. This client wants a landscaped swath of trees, shrubs and flowers that define the BACK of her property and block her view of her neighbor’s back yard. Her soil is pure clay—tan, moist, heavy, the kind of stuff you could bag and sell at an artist supply store.
So I raised the bed sixteen inches by installing two rows of that godawful concrete block, along the BACKSIDE of the raised bed (and set ten feet from the neighbor’s charming chain link fence, due another drainage setback requirement). The bed—or berm—will remain at this height from back to front where it tapers sharply and drops down to grass level.
First we tilled a straight line ninety feet long running parallel to the fence. I measured ten feet off the fence at each end, and ran a string between two stakes. Running the tiller just inside the string kept the line straight. Next I laid a hose around the front, moving it until I found the gentle curves I was looking for at the front of the bed (the part that will be seen by the client, who, incidentally, has one of the coolest jobs on the planet: She designs ice cream flavors for Haagen Daz).
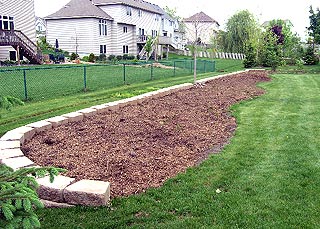 |
| Gentle curves for the front of the bed were found using a garden hose. |
A previous landscaper had plunked three lilacs down along one end, so I curved the new bed up that one side to invite them to the party—poor, lonely souls—and being the perfect host, I will be certain to introduce them to lovely new shrubs of a higher order.
We excavated the till line to a depth of five inches, by twelve inches wide. We shoveled in four inches of Class V base gravel, compacting it with a hand tamper in two-inch layers. The concrete block is ten inches wide, so this twelve-inch wide gravel base allows for an inch strip of solid base along the front and back of the wall. I did NOT top off the base with a one-inch layer of sand, which would have ensured perfect horizontal level of the block (you can fudge the sand to adjust block and keep it flat and true). I would have used sand had we been going up more than two courses, or if the wall would have been a part of the design to be viewed by the client, which, since it’s concrete, could never be the case (I would have built a stone wall). Instead I just checked along the length of the base with a six-foot level, and scattered additional Class V here and there to fill in dips and make the gravel base uniformly flat and level. A time saver, basically.
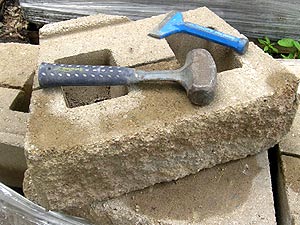 |
| Chisel lip off to lay first course level. |
The concrete block has a one-inch lip along the rear-bottom of each piece, it overhangs the piece below it for structural integrity and so that you can keep a uniform setback as you build your courses. But this lip gets in the way when you set your first, bottom course—you want a flat bottom—so the first thing you do when installing block is chisel the lip off all the base blocks, so they will lie flat.
After the wall was built I painted a white line just inside my curving hose using outdoor contractor’s spray paint, available at hardware stores. I removed the hose and tilled this line, then continued tilling the whole bed to a depth of eight inches. I did not first remove the sod or spray with Roundup; I wanted to till that green grass, root system, and measly one-inch layer of black mineral soil that had been spread over the clay right down into the clay, for a starter dose or organic material.
Then, a neat trick: We had 10 cubic yards of special clay-buster compost delivered to the job site. For those Renegades lucky enough to live in the Twin Cities of Minneapolis and St. Paul, call Minnesota Mulch & Soil (651-755-4371) and they’ll deliver. This is wicked stuff—a mixture of composted pine needles, UNCOMPOSTED horse manure, regular compost, and vermouth, I think, maybe some mint. No wait, I’m thinking of something else.
It’s rough compost with a very high organic content (the horse manure) and when it arrives it smells like Iowa. But you shovel it over the clay then till it and till it down into the soil, and let that horse manure go to work. I’d have watered the area had it been a dry season. Now we have let it sit for three weeks. We will be adding a good quality garden blend soil on top next week, giving me a twenty four inch-deep, amended bed for the trees and shrubs.
 |
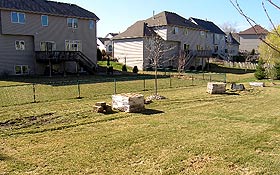
SO THAT’S WHERE WE’RE AT. In the meantime we worked on Job #2, West Suburban Mansion, the “before” photo pictured here.
So next update I’ll show and describe Phase II of Job #1, and Phases I & II of Job #2.
Don Engebretson
The Renegade Gardener