RENEGADE GARDENER™
The lone voice of horticultural reason
The Way with Clay
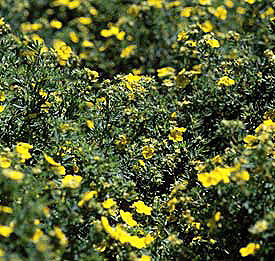
Potentilla somethingorother ‘Ugh’
3-1-07– Just flew back from Peoria, and boy, are my arms tired. Central Illinois RULES, and to all the great gardeners who came out to play with me at the Peoria Home & Garden Show, I say, thank you for your most sincere warmth and hospitality. To the man who took offense at my Potentilla joke (“What’s the common name for Potentilla, I always forget…Gas Station Shrub, that’s it, it came to me…”) my sincerest apologies. In truth, I think it’s a dear little shrub, a little too dear for use, but it must have some value, it’s apparently a code requirement for every town home development in the Twin Cities.
One of the big topics of discussion was the potter’s clay masquerading as soil that most of the central Illinois gardeners are forced to contend with. One of the show attendees even brought a chilly, great glob of it along with him in a garbage bag to one of my Saturday talks. There was an area of artisan exhibits in a large conference room off the lobby, so I borrowed a potter’s wheel and at the end of my performance spun a beer stein out of it. Dastardly stuff.
The rap I gave to Peorians on how to deal with clay soil applies to all readers anywhere in the world who screw up and buy a house without first digging eighteen-inch deep holes across the entire property. Here it is:
The way to combat clay soil is by adding copious amounts of organic matter. Compost is best, either make it yourself, or call around and find a supplier in your area who will deliver it by the yard (27 cubic feet, a pile about the size of a low-crouching Ninja). Perhaps your city or county makes it, and this stuff is often free to homeowners. Quality of municipal composts will vary, as will the color of the shredded garbage bags requiring sporadic extrication.
Landscape and soil supply outfits sometimes have for sale blended composts made specifically for busting up clay, often pine needle- or pine bark-based concoctions, and these work very well. Renegades living in the Twin Cities of Minneapolis and St. Paul, Minnesota, have it made, of course; there are three good suppliers of these types of composts, e-mail me if you’re a local.
The Minnesota Twins are winning the World Series this year, by the way.
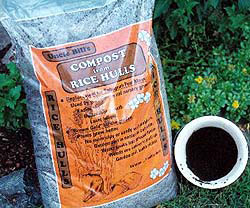 Composted manures that you see in bags at the garden centers are very good, though they are quite soil-like in texture, and are best spread as a subtle layer atop rough compost, prior to tilling. Composted rice hulls are fantastic, little chits of hard, neutral pH organics that last for up to five years without breaking down in the soil. These are readily available in bulk and widely used in soil mixes in the southern states, their origin. About the only place you find them in the north is, again, the Twin Cities, because the Twin Cities are hip to them and there’s a guy in town who buys rice hulls by the barge load and ships them up the Mississippi. Did I mention the Twins are taking it all this year?
Peat moss is fine, go buy bale after bale of it, keep a tall stack of bales lurching precariously against the back wall of the garage until time and weather fades all the print from the plastic, but all by itself, peat moss is a rather tepid solution. It’s kind of wimpy, very fine and doesn’t hold up more than a couple of seasons. As with composted manures, it’s best used to supplement other organic materials when you discover you didn’t order enough yards of good stuff.
Gypsum works, the application rate should be on the bag, gypsum alone isn’t nearly as good as a composted organic material, so cut the application rate of the gypsum in half and use both.
Two weeks before you begin, take a soil test sample of the clay and another of the organic material you’ll be using (if pH is not known) and send it to the lab, either the lab at your state university, or the private lab that was recommended to you when you called the county extension office at your state university. We know it’s clay, let’s find out what the nitrogen, phosphorus and potassium (N-P-K) levels are, and the pH. Find out the pH of the organic you are using, particularly if compost. A good commercial supplier will often know, your city or county probably won’t.
Some labs don’t test soil for nitrogen because it rises and falls so readily. But the pH is the big thing. Clay often runs alkaline (7.1 or higher—a lot higher—on the pH scale) though it occasionally tests perfect, 6.4 to 6.9 (slightly acidic).
Work with your county extension office about interpreting the results of the soil test you’ll get back in a week to ten days, since they are printed in Greek. They will tell you what substance to add to the soil, and in what amount, to raise or lower the pH, as needed. Often it will be soil sulfur if the pH is too high, and lime if the soil is too acidic. Discuss all this with your county extension agent or the soil person at the private lab, you’ll figure it out.
The additives used to adjust soil pH are spread directly on top of the clay at the rate prescribed by the soil test results. Opah!
Next, introduce the organics to the clay soil. Plan A: Spread a good five- to six-inch layer of the organic material over the area to be gardened, then till it in, slowly, with a power tiller. This is a chore best performed in the fall, if you have the foresight to prepare the garden bed for spring planting. That winter rest allows the organics to go to work, and the soil to begin setting structure. Next best time is spring, and yes, you can go ahead and plant it as soon as you are done, stuff will grow. Or, do it midsummer, if you’re like me.
In all cases, you want to catch the clay when it is just barely moist. If the clay is very dry and hard, water it a bit and wait several days. If it is wet and slick, leave it alone until it dries out some. Tilling damp clay is useless, and you’re just going to slip on your bum (quick nod to all you Canadian Renegades) every three minutes.
You’ll need a big, dumb, rear-tine rototiller, five horsepower at least. You want one that has tines that go backward while the wheels pull forward. Many people ask, what’s the best kind of tiller to use, a Honda tiller, a Snapper tiller, or a Toro tiller? I say, a rental tiller. Get a big, dumb one, and if you goof around with the carburetor settings and throttle cable you can usually get it to fire up way higher than it’s supposed to, which is what you’ll need to bust into that godforsaken clay.
Do not use a Mantis or any of the other slight, zinging little tillers that you see advertised. A soil expert at the University of Minnesota told me that those little high-pitched tillers spin the tines way too fast, and completely destroy the soil structure. Even when you use them in soil that’s decent to begin with, they whip it into silt, and clay is already a sand-based silt. They turn the organic material you’ve added into powder, and the point of the organics is to get something fairly coarse mixed into the clay. Besides, they are not heavy enough to penetrate clay in the first place, unless you happen to be Martha Stewart.
I was watching Martha Stewart on TV one day, she was answering viewer mail, a woman had written in to ask what was the best way to store eggs. Martha finished reading the letter, looked up at the camera, and said, “Well, I have my own chickens, so I go out each morning and collect fresh eggs…” How can you not love Martha?
Working the tiller slowly, pulling back on it, sliding it gently side to side, you work the organics in. Nice if you can work down to the maximum depth of the average tiller, about eight inches. Pull that depth control bar at the back of the tines all the way up. Another advantage to a rental, this bar will usually be missing.
You’ve worked the organics down eight inches into the soil, and that’s about all you can do. You’ll have raised the area a bit, because of the addition of the organics (though not six inches, the loosened clay has compressed the organics somewhat), so you mound it slightly with a bow rake. It’ll settle more the first season.
Very important, top dress the bed with a one-inch layer of fresh organic material once a year, either in fall or spring. Stuff will grow immediately, but it’s going to be more like three, four years down the road that the organics really kick in and begin loosening the soil surprisingly deeper than eight inches. After one year, the microbes start feeding on the organics and multiply into the billions, and the soil comes alive. You’ll see earthworms return within a year or two, and they really start moving the organics around, and busting up the clay.
Plan B: Do exactly as above in Plan A, then ring the entire bed with a twelve-inch high edging of fieldstones, wall stone, or other natural stone. Use wooden timbers or concrete retaining wall block, I swing by and rip it out. Then order in a load of good quality blended garden soil, and add a foot of this soil atop the tilled clay. You have just created a twenty-inch deep bed of good gardening soil, called a “raised bed.”
Plan C: Hire a landscaper or excavator to come over, turn on a mud-coated radio blasting classic rock, excavate twenty inches of the clay, then replace it with twenty-four inches of good gardening soil (the extra four inches accounts for settling). This is not a bad way to go if you can afford it. Yes, you have created a bathtub effect, so you learn to adjust your watering, and you water less. You can also have them excavate one foot of clay, and raise this bed via stone edging, which will make for better drainage.
All there is to it. This is called gardening.
Don Engebretson
The Renegade Gardener